Springboard Trust’s programmes are built on connection. Principals partner with volunteers, each bringing their unique insight and perspective to a relationship that builds stronger leaders.
But in the current environment, that connection is harder to build. We are all in our bubbles, and face-to-face connection is extremely limited.
We have tools to overcome this as best we can – and one of the most reliable we’ve used so far has been Zoom. Today, we’ll walk you through how – and when – we’re using it.
What is Zoom?
Zoom is a cloud-based video conferencing app, that anyone can pick up and use. You can use it in your browser (like Google Chrome or Edge), or download the app and use it from your desktop. The National Cyber Security Centre recommends using the desktop application, then the in-browser version, with the Zoom mobile app to be avoided wherever possible.
Additionally, it’s important to make sure you always update the app as soon as one becomes available – this keeps you up to date with the latest security patches and tweaks.
When Springboard Trust is using Zoom
As an organisation, we have replaced all face-to-face communications with video conferencing. For smaller meetings – say, fewer than five people – we often use Microsoft Teams.
But with Zoom, you get a much more comprehensive view for bigger calls. When there are five or more people on a call, Zoom has a useful ‘gallery view’ that turns everyone into the Brady Bunch titles, rather than you only being able to see the person who is speaking.
So as a rule of thumb, we use Zoom when we have six or more people on a call. Typically, our team does one of two things in Zoom: they set up and schedule a meeting for others, or they join a meeting that someone else has set up.
Download
Springboard Trust SBT IP | Participants Zoom GuideSpringboard Trust
How to use Zoom in the workplace
Zoom has their own very useful guides for setting up and running meetings – we are going to run you through an adaptation of our own guidelines as well.
1. Setting up Zoom
You don’t have to have a Zoom account to join a meeting – the host (person who created the meeting) can send you a link that you can click regardless.
But if you want to host your own, setting up an account is a good idea. Simply go to Zoom.us, and click the Sign Up button. It’s free, but if you use a paid account, you get access to hosting meetings longer than 40 minutes with more than two people. It’ll also be much easier to set your own meetings up if you have an account.
Go through the steps, and you have it! You’ll also be given the opportunity to download the app – not essential, but handy (and preferred by the GCSB).
2. Setting up and scheduling a meeting in Zoom
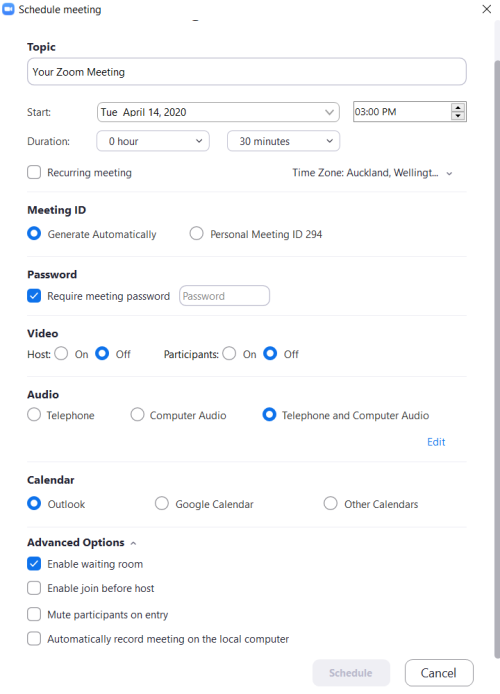
Depending on whether you’re in the app or the browser, you’ll have a button saying ‘Schedule a meeting’. Clicking this takes you to a screen where you can fill out all of your meeting’s details.

Many of these are straightforward – the time, name and video or audio settings in particular. However, some of the settings might not be familiar to you.
- ‘Enable join before host’ is something the GCSB recommends keeping off (do not tick).
- ‘Mute participants upon entry’ is good practice, to avoid sudden loud noises on the call
- ‘Enable waiting room’ is a useful security measure and, as of April 9th, turned on by default for individual accounts
- ‘Record the meeting automatically’ is useful if you want to review the call later on
Please note that in early April, Zoom made several important changes to its security, notably automatically be turning on meeting passwords and waiting rooms for individual accounts. There is also a new security button available in-call. You can read more about the latest updates to settings here.
3. Inviting people to a Zoom meeting
Once you have scheduled a Zoom meeting, it will show up in the ‘Meetings’ tab of your Zoom account. You can change the time and settings from there.
Additionally, you can add it to one of your existing calendars – Google, Outlook or Yahoo. Just click one of the buttons to add it, and you’ll be taken to the relevant calendar with everything set up for you!
From here, you can add invitees and a personalised message for the meeting. People will be sent the calendar invite, which contains a link to the meeting and all the details you want them to know.
Alternatively, there is a section to ‘copy the invitation’ – this gives you a URL that you can put in your own calendar event, or just include in an email or chat to someone you want to meet with.
When it’s time for the meeting, you have the option to click ‘Start Meeting’, or just click the link in your event! Only can the host can start the meeting if you have that setting turned on, as long as you have ‘enable join before host’ turned off – which is a good idea!
4. What to expect when you’re in a Zoom meeting
When you enter a Zoom meeting, it should look like this (except you’ll see yourself and others instead of a stock photo of a bunny):

How to use Zoom in the workplace
Zoom has their own very useful guides for setting up and running meetings – we are going to run you through an adaptation of our own guidelines as well.
1. Setting up Zoom
You don’t have to have a Zoom account to join a meeting – the host (person who created the meeting) can send you a link that you can click regardless.
But if you want to host your own, setting up an account is a good idea. Simply go to Zoom.us, and click the Sign Up button. It’s free, but if you use a paid account, you get access to hosting meetings longer than 40 minutes with more than two people. It’ll also be much easier to set your own meetings up if you have an account.
Go through the steps, and you have it! You’ll also be given the opportunity to download the app – not essential, but handy (and preferred by the GCSB).
2. Setting up and scheduling a meeting in Zoom
Depending on whether you’re in the app or the browser, you’ll have a button saying ‘Schedule a meeting’. Clicking this takes you to a screen where you can fill out all of your meeting’s details.

You’ll be asked what kind of audio to use – just select ‘Use Computer Audio’. Then you should be able to hear everyone!
The next step is checking everyone can see and hear you. In the bottom left are the ‘Mute’ and ‘Start Video’ buttons – click these to turn your audio and video respectively off and on.
In the middle are a few buttons:
- Invite is to bring other people onto the call – you can do this by entering their email
- Manage participants is a button for the call host to mute or manage everyone on the call
- Share is for screen sharing – you will get to select a tab or screen that you want to share with everybody else.
- Chat brings up a text window on the right, where everyone can do a text chat – useful to keep people from talking over one another. You can chat with everyone, or a specific individual.
- Record is a host-specific button, to turn this on and off as required. – able to be given to others
- Breakout rooms is a button for hosts, where they can set up multiple ‘rooms’ and assign people on the call to them. This is useful for more close-knit sessions within a larger workshop.
- Security is a button for hosts that lets them lock the meeting (preventing new people from entering), and adjust other security settings for participants.
And that is the basics of being on a Zoom call! We’ll be back soon with some more advanced Zoom tricks, like running whiteboards and breakout rooms – as well as some best-practice data security from the NZ Cyber Security Centre and GCSB.
In the meantime, if you have further questions or need some guidance on using Zoom, please get in touch with the Springboard Trust team. We are well-versed in these tools and are happy to assist you or your leadership team with getting up to speed.


